Understanding the filesystem and storage device management in Linux involves learning how Linux represents files, directories and storage devices such as hard drives, flash drives, etc.
Linux Filesystem Basics
One of the most fundamental aspects to understanding the Linux filesystem is knowing how drives and other storage devices are mounted (Attached to the filesystem in order to make them accessible to the operating system) on the filesystem, leading up to the / (root) directory.
Ways the Linux Filesystem is Different From the Windows Filesystem
Linux’s filesystem possesses a number of differences from the Windows filesystem. Get used to not finding drive denoted with letters or backslashes, and start getting familiar with multiple files having the same name, differing only in capitalization.
Directory Structure
You won’t find any Windows, Program Files, or Users folders if you start browsing around the file system on your Linux computer. (Although the /home/ directory is very similar to the Users folder.)
The Linux directory structure doesn’t just use different names for folders, it uses an entirely different layout. For example, on Windows, an application might store all its files in C:\Program Files\Application. On Linux, its files would be split between multiple locations – its binaries in /usr/bin, its libraries in /usr/lib, and its configuration files in /etc/.
Case Sensitivity
On Windows, files cannot have the same name so you can’t have a file named “file” and another file named “FILE” in the same folder as theWindows filesystem isn’t case sensitive.
The Linux filesystem on the other hand is case sensitive so you have files named “file“, “File“, and “FILE” in the same folder as Linux treats capitalized letters and lower-case letters as different characters.
Backslashes vs. Forward Slashes
Much like DOS, Windows uses backslashes, so the path to a user’s directory on Windows is:
C:\Users\Name
On a Linux filesystem, the path to a user’s home directory is:
/home/name
No Drive Letters
The Linux filesystem has no physical representation of
the drive, like the C:, D:, or E: system in Windows, which exposes partitions/ devices as drive letters. If you have multiple hard drives, multiple partitions on the same hard drive, or removable devices connected, each attached file system is available under its own drive letter. Linux on the other hand, makes use of a file tree structure with “/” (root) at the top and everything falls underneath it; there are no files above the root directory, as there can be files outside of C: on Windows. When you connect a device to a Linux based system, it becomes available under /media/.
The Device Directory /dev
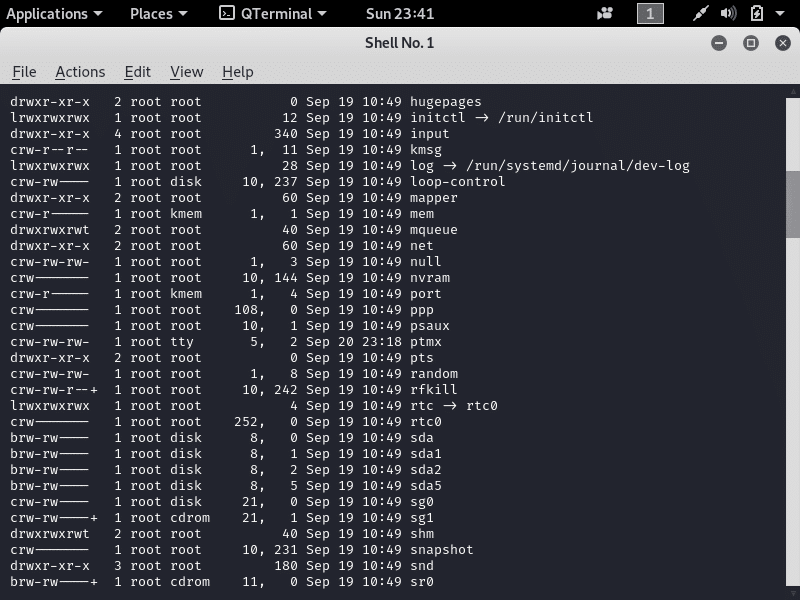
For the uninitiated, “dev” is short for device, and every device in Linux is represented by its own file within the /dev directory. Let’s run the “ls” command with the “-la” flag on the directory so you can see what it looks like.
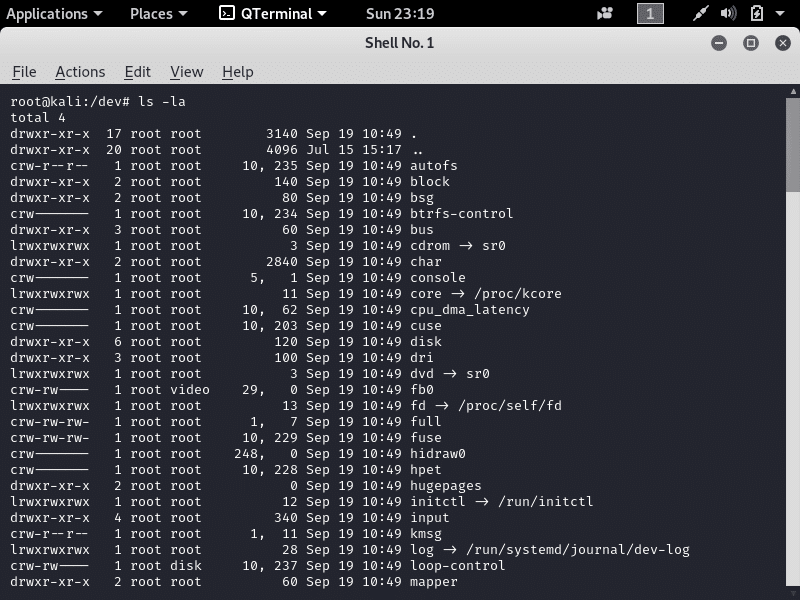
Devices in the /dev directory are displayed in alphabetical order by default. Some of the file/device names are readily recognizable, while others have names that are less so. The take away point here is that each device on a Linux system is represented by a file in the /dev directory.
If you scroll down this screen a bit, you should see devices named sda1, sda2, sda3, sd5, and sg1, which are the hard drives, their partitions and cd rom drive.
How Linux Represents Storage Devices
Linux uses logical labels, which vary depending on where the drives are mounted, for drives that are then mounted on the filesystem.
Initially Linux represented floppy drives as “fd0“and hard drives as “hda“. You may see these drive representations on legacy Linux systems that use IDE or E-IDE interfaces as “hda“. Serial ATA (SATA) interface drives and Small Computer System Interface (SCSI) hard drives are represented as sda. Drives are sometimes split up into sections known as partitions and are represented in the labeling system with numbers.
As systems often have more than a single hard drive, Linux labels them serially by incrementing the last letter in alphabetical order (the serial letter after sd is often referred to as the major number), so in the screenshot above, the first drive is sda , the next drive would be sdb, the third drive would be sdc, etc and etc.
Drive Partitions
Drives can be split into partitions in order to separate differ information on the drives. You may want the swap file, home directory, and root directory on separate partitions to facilitate resource sharing and manage security. In Linux, partitions are labeled with a “minor number” that comes after the drive designation, so partitioning of the first hard drive would look like:
- sda1: First Partition
- sda2: Second Partition
- sda3: Third Partition
In order to view the partitions on a Linux system, use the “fdisk” command with the “-l” switch. As seen in the screenshot below, this shows you the disk partitions on your system as well as the capacity on each of the partitions.
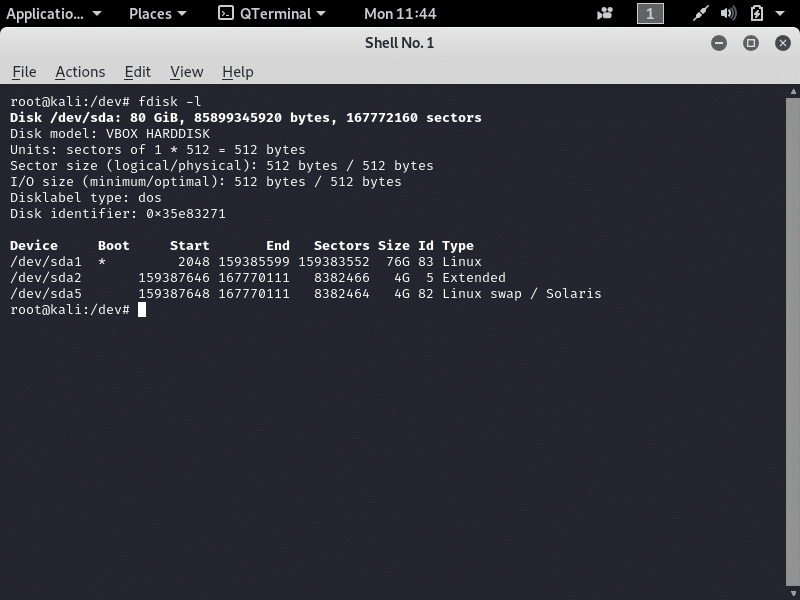
Sda1, sda2, and sda5 are listed as devices on the virtual machine’s disk. the virtual disk from my virtual machine, which is a 80GB drive with three partitions, including the sda5 swap partition
Depending on your system’s configuration, you may see other devices along with an indication of the type of filesystems on those devices as well as the type of system that created it. This is important because Linux may need to work with systems that are not native to Linux, which have different ways of storing and managing files.
Character and Block Devices
C is for cookie that’s good enough for me
Cookie Monster
When looking at the /dev file with the “ls -la” command, you will see that files contain either a “c” or “b” in the first position, representing the way that storage and input devices transfer data to the computer. The “c” stands for character, and these external devices, such as mice and keyboards are known as character devices that send the Linux system data character by character. The “b” stands for block devices, like hard drives, that communicate in blocks (multiple bytes) of data and require higher-speed data throughput.
lsblk: Listing Block Devices and Information
The command “lsblk” (list block), outputs basic information about each block device in /dev. While similar to the output to “disk -l” output from fdisk -l, but it offers a tree-like display of devices with multiple partitions, showing each device with its partitions as branches, as well as mount points. The command’s output may include the floppy, removable, DVD and CD ROM drives, even if they are not on the system We can also see information on the mount point of the drive—this is the position at which the drive was attached to the filesystem.
Mounting and Unmounting
Modern operating systems auto-mount storage devices when they’re attached, meaning the new flash drive or hard drive is automatically attached to the filesystem. In systems that do not automount devices, in order to make use of it, two things must occur:
- It must be physically connected to the filesystem; and then,
- Logically attached to the filesystem.
Once the two steps are done, the data is available to the operating system. If the device is only physically attached to the system, it is not logically attached and the data is not available to the operating system.
The point in the directory tree where devices are attached is known as the mount point, the two main mount points in Linux are:
- /mnt
- /media
Usually, you mount internal hard drives at /mnt, and the mounting of external USB based devices occurs at /media.
Manually Mounting Storage Devices
Mounting a storage drive on a Linux filesystem uses the “mount” command. The mount point for the device should be an empty directory because if you mount a device on a directory that has existing files/subdirectories , the mounted device will cover the existing contents, making them invisible and unavailable. So, to mount the new hard drive sdb2 at the /mnt directory, you would enter the following:
mount /dev/sdb2 /mnt
This command then makes the hard drive available for access.
Filesystems mounted on a system are kept in the filesystem table file at /etc/ fstab that gets read by the system at bootup.
umount: Unmounting Devices
Notice the command for unmounting a device is “unmount” and not unmount. You cannot unmount a device that is busy, so if the system is reading or
writing to the device, you will just receive an error.You unmount a devices by entering the umount command followed by the file entry of the device in the /dev directory.
umount /dev/sdb2
Monitoring Filesystems
Knowing how to monitor the activities of a filesystem is an essential skill for a system administrator, so we will review how to monitor the state of your mounted disks/filesystem.
Getting Information on Mounted Disks
The “df” command provides us with basic information on any mounted devices, such as CD, DVD, and flash drives, including how much space is being used and how much is available.
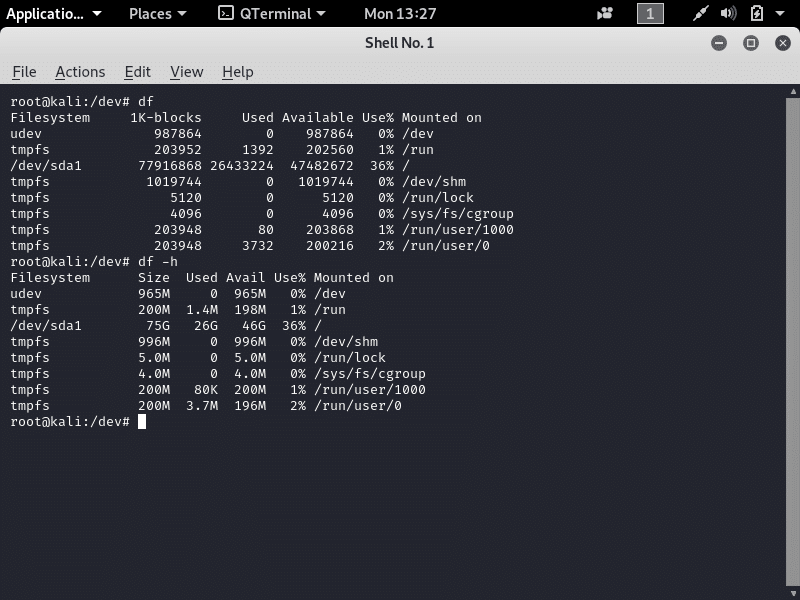
In the first part of the screen shot above, the “df” command, without any switches, shows information about the first mounted storage device. Without any options, df defaults to the first drive on your system. The first line of output here shows category headers:
- Filesystem
- 1K-blocks
- Used
- Available
- Use%
- Mounted on
and then we get specific information on the disk in question. and in this case, the virtual disk on this system is designated “sda1“, which breaks down as follows:
- sd: SATA hard drive;
- a: First hard drive; and,
- 1: First partition on that drive.
The disk space is given in 1KB blocks. On the third line of output, /dev/sda1 has 77,916,868 one-kilobyte blocks, with 26,422,224 being used and 47,482, 672 available for future use. We also see that this drive is mounted the top of the filesystem.
The filesystem check or “fsck” command checks the filesystem for errors and if possible, either repairs the damage or list the error area into a bad blocks table. Before running fsck command, you must:
- Unmount the drive. Failing to unmount the drive will throw an error message;
- specify the filesystem type; and,
- specify the device file to check.
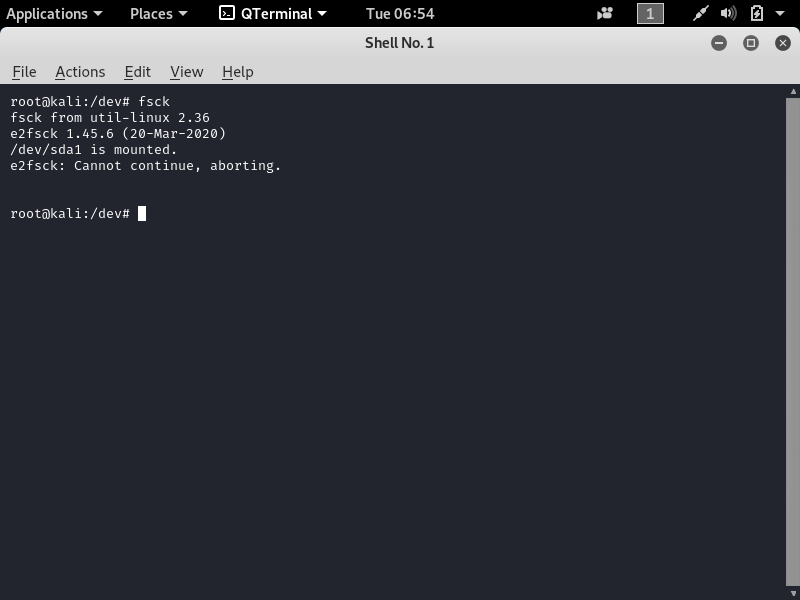
The first step in a filesystem check is to unmount the device. In this case, we unmount an external drive to run a filesystem check:
umount /dev/sdc1
Adding the -p option to have fsck automatically repair problems with the device:
fsck -p /dev/sdc1
With the device unmounted, you can check for problems/bad sectors with the following command:
fsck -p /dev/sdc1
And the output of the command will look something like this:
fsck from util-linux 2.30.2
exfatfsck 1.2.7
Checking file system on /dev/sdb1.
File system version 1
Sector size 512 bytes
Cluster size 32 KB
Volume size 10000 MB
Used space 2500 MB
Available space. 7600 MB
Totally 27 directories and 1243 files.
File system checking finished. No errors found.